To date, all my designs have been knitted in pieces from the bottom up and seamed. By this, I mean the patterns call for knitters to knit the back, fronts and sleeves separately then, using yarn and a needle seam the pieces together to create a finished garment.
In many ways, this way of knitting very much at odds with modern knitting. Today, the focus appears to be knitting a garment in one piece or from top-down using circular needles. Some of this is driven by a distinct dislike of seaming and an ‘easier’ way of knitting.
One of the reasons I like knitting in pieces and seaming is it gives the garment structure and stability particularly in areas of the knitting like shoulders and side-seams that are prone to stretching
This is particularly true of set-in sleeves. Yet, set-in sleeves are a problem for many knitters as they struggle to fit them properly.
In this tutorial my aim is to show you that knitting a sleeve that has set-in sleeves is not as hard as many knitters make it out to be and, that done well, such a sleeve will give your garment an elegant finish.
Let us begin with two definitions of set-in sleeves:
‘A sleeve joined to the body of a garment at the shoulder and having a seam at that juncture’ (unknown source).
‘A set-n sleeve cap is shaped like a narrow bell curve that extends from the base of the underarm to the shoulder, across the top of the shoulder and back down to the base of the underarm’ (Paden p84).
Knitting is a process. There is a beginning, a middle and an end. In this context, I want to begin this tutorial with the process of set-in sleeves.
Sleeves begin at the cuff and usually this is knitted in either k1, p1 or k2, p2 rib stitch for around 2 inches (5.5 cm). Changing to bigger size needles, the sleeve progresses in a pattern – stocking stitch, cable or lace for example while at the same time, slowly increasing the number of stitches to accommodate the width of an arm.
Once the desired length of a sleeve to underarm is reached, the knitting turns to decreasing stitches beginning with a match-up of armhole decreases as per back and front of a garment. In the main, after the match-up, further shaping is achieved by using raglan or set-in sleeve method of decreasing stitches.
Raglan sleeves will be the subject of another tutorial.
There are four distinct sections to knitting a set-in sleeve.
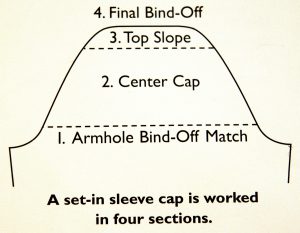
- Armhole bind-off match
- Centre cap
- Top slope
- Final bind-off
The armhole bind-off begins the process and is where you cast off the first number of stitches as happened in the back/front armhole decrease. Typically, this is between 3 to 6 stitches on each side depending on the size the garment is knitted in.
The centre cap is where the bell-curve comes into its own. Typically, stitches are decreased on every row and are between 1 to 2 stitches.
The top slope decrease is usually 3 stitches on every row for 4 rows. This levels off the bell-curve and is a run-in to the final bind-off.
The final bind-off is casting off the remaining stitches after following steps 1-3.
In the second part of this tutorial, the post-knitting stages of seaming set-in sleeves are explained. There are seven steps to this process
Step 1: Seaming the shoulders
Step 2: Placement of first pin at shoulder seam
Step 3: Next two pins at where the bind-off stops
Step 4: Matching the straight edges at the top slope
Step 5: The bell-curve pinning ending with the armhole bind-off match
Step 6: Check your work
Step 7: Seaming
Step 1: Seaming the shoulders
I tend to use mattress stitch for most of my seaming. It is easy to do and gives a finished edge that is not too bulky. Having said that, you can seam in any stitch you feel comfortable with.
Note: What stitch to use when seaming will be the subject of the next tutorial.
Step 2: Placement of first pin at shoulder seam
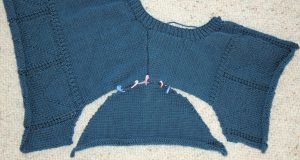
Note: The secret to a great finish in set-in sleeves boils down to good pinning. If your pinning is good you will see from the outset if there are any mistakes to be fixed first for example: if the sleeve will fit the armhole.
Note 2: When pinning you can use ordinary pins if you wish. I prefer to use the lockable stitch markers as they give a more workable base when seaming
The shoulder seam is the exact start of the pinning process. Fold your sleeve in half and place a pin in the centre stitch.
Match that with the shoulder seam.
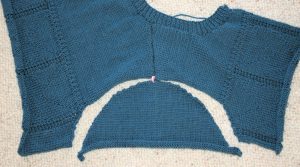
Step 3: Next two pins at where the bind-off stops
The next two pins are placed at where the bind-off stops at each end of the final bind-off. This gives you a visual understanding of where the bell-curve starts.
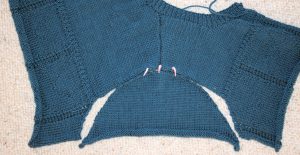
Step 4: Matching the straight edges at the top slope
This step matches the stitches in the top slope
Step 5: The bell-curve pinning ending with the armhole bind-off match

Typically, the bell-curve will have more shaping and less height, and the armhole edge will have the opposite. At this stage, when you are new to set-in sleeves, you are liable to have a wee panic attack – thinking it is all not going to fit.
Wool is a very forgiving and stretchy fabric to work with and this is where that word ‘ease’ comes into play. As you pin, slightly stretch the bell-curve edge to allow for a perfect fit.
You will have to trust me on this one. It will fit!

Place your first pin at the armhole match up then add further pins, working your way from the top of the bell-curve to the armhole match.
Step 6: Check your work
This step is crucial. Make sure that everything matches and there are no noticeable puckers or overly stretched areas.
Step 7: Seaming

Using a long tail and starting at shoulder seam, work first one half of the bell-curve then threading the needle with the long tail, work the other side.
In the next tutorial, the seaming process is demystified.
Set-in sleeves pdf – click to download
Bibliography
Paden, Shirley. Knitwear Design Workshop: A Comprehensive Guide to Handknits, Interweave Press, 2009
Mainly Cardigans 2020
Email: [email protected]